Friday, 6 March 2009

The Software

Adobe Photoshop Lightroom
This program allows me to quickly find and images either in Jpeg or RAW file format, then edit them in ease, by using simple sliders to change exposure, contrast and among many other things.

Layout
The program is laid out into five tabs which allow you to do different elements of editing or filing by clicking each of the headings.
The headings are:
  • Library
  • Develop
  • Slideshow
  • Print
  • Web
The main two modules which are used are Library (to find the images) and Develop (to develop the image)

The program layout is shown in the print screen image below:
The program is very easy to navigate as the bottom bar features the photos within the import folder you are viewing and all folders are easily viewable in the left hand window. As for developing the images, quick develop options can be used but the full options are only available when you click the 'Develop' module at the top of the screen:


As for the features in the Develop tab, I can do all the basics such as change Exposure, White Balance, Contrast, Brightness etc... some of the alterations can be seen in the print screen image above.

Lightroom is the perfect tool for simple image editing, if the image itself doesn't need a great deal of deep editing (changing subjects, cloning subjects etc) then Lightroom is the ideal tool to give the image you are editing some more presence and vibrance.

However if you wish to do more complex editing to an image, you'll need to use Adobe Photoshop which is discussed below.

Adobe Photoshop
This program is more advanced than Lightroom as it allows you to not only change the basics of the image light Lightroom will, with the built in Adobe Camera RAW program, it will also allow you to edit subjects within the photograph, for example move a signpost or a person to a different location, or get rid of them completely, which can be useful when you cannot shoot the photo without these subjects being in the frame.

The print screen below shows the Adobe Camera RAW program which can be used to make minor adjustments to the image before continuing to make changes to the photograph in Photoshop itself:
When you have finished making changes to the file, you can either save the image and not proceed to Photoshop, by clicking the 'Save Image' button on the bottom left, or proceed to Photoshop by clicking 'Open Image' which will then bring you to the next srceen, shown below:


Many options are available on the right hand side to edit basics in the photograph, although there are many, more photography specific options in the layers tab shown on the right.

These different options all create an adjustement layer which sits over the top of the background image, none of them permantly change the background image, all they do is take the information from the image and then change as per the options selected by the user.

The different adjustment layers allow me to change contrast/exposure and gradients amongst many other very useful alterations.

Wednesday, 4 March 2009

The Hardware

For the project I will use several different pieces of equipment which will help me to produce top quality photographs to be displayed in the summer show during Summer 2009, this blog entry describes the equipment which I will use and why I want to use it.

My own Personal Equipment

The Camera
Canon EOS 400DMy main camera which I have owned for around 2 years now; it has seen me through all of my photography projects to date and I am very proud of the results it has given me. It may be time for a change at some point in the future but for now I am happy with my current camera.

The camera has one of Canon's L lenses mounted to it which benefits me in the ways I have described below; other benefits that the EOS gives me is the ability to shoot RAW images at 10 Megapixel which is adequate for a fairly large print, although other, newer SLR cameras now far exceed this benchmark.

For this project I am confident that my camera will give me good enough images to display in the summer show of 2009.

The Lens
Canon 17-40mm L USM
This lens allows me to get wide angle photographs with confidence, due to the incredible quality of the optics inside this lens. So for my project, whenever I venture out to grab a photograph of the stars, I will take my camera with this lens pre mounted to enable the best possible image capture.

The lens is wide angle, although it may be good to try to get hold of a fish eye lens which will enable further distortion of the scene and allow me get more of a star trail into the frame while having an interesting foreground subject in the composition.

The Tripod
Manfrotto 055xPROB

To make sure my photographs are as sharp as possible, I need to use a sturdy tripod which won't move when the wind blows. I bought this particular Manfrotto tripod around a year ago which will help me get much steadier images, in conjunction with a good quality mount for the tripod, I will improve my chances of getting a sharp image.

The image on the right shows the tripod legs and the rotating central pole which allows lower compositions on the tripod, the top of my tripod has a mount screwed on which gives me full rotation of the camera while it's mounted on the tripod.


Remote Shutter release
RS60-E3

This little device is very central to the whole project as it allows me to set the camera to 'BULB' mode and then keep the shutter open indefinitely until I choose to end the photo taking process.
As the photo below shows, there is a 'Running Lock' which is essentially able to hold the shutter open for as long as I want, all you have to do is plug the remote into the camera and then push the button down to focus and then push up to lock the shutter open, as shown in the second image below.
I will also use torches to help focus the camera on the foreground subject as it will be well after sunset when I venture to the locations for my photo shoots.

Borrowed Equipment
While I work with my own equipment, I may borrow these pieces of equipment from our store at PCA which will enable me to try some different mediums on which to record my photographs.

Hasselblad Medium Format (500cm)
This camera has been a favourite of mine during my last year or so at PCA as it is relatively easy to use as much of the settings are just the same as a normal SLR camera, it is more difficult to load a film into the camera, but is still relatively easy provided you are careful with the film as it can slip off the spool easily.

The image beow shows me using the camera last year up at Brentor Church, near Tavistock:

It is a strange camera in that you can compose your picture by looking down into the square shown above instead of looking into a viewfinder facing forward; it is even more unusual when you go to focus the image with the pop up magnifier in the composition square.
Although all these elements are different, I find the camera fun to use as it is so different from any other camera but not too hard to get used to or use.
Back in the first year I produced some excellent images of a viaduct in Cornwall which has ever since inspired me to use the camera to produce high quality images which can then be scanned in to a computer and printed digitally.

Large Format?
I did have possible thoughts about using a large format camera, but it is just too difficult to get decent results with the camera, here are some of the reasons why I don't wish to use one:
  • The whole kit weighs far too much to go carrying across Dartmoor as I have found out previously, I want to be able to travel light, either with a Medium Format camera or my Digital setup
  • Processing films after shooting is very difficult and can be expensive as I will not be able to process any colour films at college
  • Medium Format can give almost the same quality in a much smaller, less cumbersome unit

First Test shoot 2nd March 2009

After looking at a great deal of research and works by other photographers, I decided to go and give the effect a try myself and see if I could produce a good photograph.

Choosing a good location for my first outing proved difficult, as I currently live in a very built up area in the centre of Plymouth, so simply walking out into the back garden would result in a poor photo being taken due to the large amount of light pollution which would result in the photo.

I gave thought to the idea and decided on a good place to start my star gazing photographs and I came up with Two-Bridges, near Princetown on Dartmoor as a good location

Here is a map showing Two Bridges and Plymouth:


As you can see, it is a fair drive from the centre of Plymouth, around 30 minutes, but I considered it worthwhile to try out some of the techniques and ideas I have looked at.

Equipment
As for equipment, for this shoot I decided to take the following with me:
  • Canon EOS 400D Digital SLR Camera
  • Canon L USM 17-40mm Wide Angle Lens
  • Manfrotto Medium Tripod 055XPROB
  • Remote Shutter (Cable Release)
  • Cloth to wipe the lens
  • Spare Battery (If available)
  • Many layers of clothing
Why Digital?
For this particular shoot I decided to use my digital camera as I want to go and have a go at the techniques I have looked at, just to get a feel for how to work under the cover of darkness and also how my camera would fair in the much lower temperatures of the night and see if it is resistant enough to be useful for the project as a whole. In the future I may decide to take a film camera out and test conditions and shooting capabilities with a more basic film camera, to get the feel with that one too.

The Lens
I have opted to use my wide angle L lens for this shoot as it is the best quality lens I own and should give me the sharpest and most accurate interpretation of what I can see with my own eyes at night.
Remote Cable Release
This is essential for night photography as many of my photographs will exceed the 30second limit in place on my camera, with the remote I can set the camera to 'Bulb' mode and essentially leave the shutter open for an unlimited length of time, provided the battery lasts, but this remote will allow me to leave the camera unattended while it takes a photograph for many minutes to capture much more light detail.

The right Tripod
It is also important to use a good quality tripod as it needs to remain very still and sturdy during an exposure. Unfortunately any movement at all can ruin the sharpness of a photograph instantly rendering it useless for editing or further improvement afterwards, so I will be using my Manfrotto tripod for every photo shoot.

Battery
It is important for me to have a fully charged, warm battery to use when I'm out shooting the photos as the camera will require a long period of battery life to finish shooting the photos I want.


Time
I left Plymouth at around 12:30AM and arrived at Two Bridges at around 1AM which gave me complete darkness in the sky without any light pollution, or at least it appeared that there was none above me anyway.

I proceeded to set up my equipment on the tripod while paying particular attention to the small clouds floating above me hoping that they wouldn't stay around too long. Eventually I had my camera mounted on the tripod with the remote cable connected and ready to go, so I aimed the camera towards the sky looking north towards Polaris.

Here is the first photograph I shot on location, in JPEG format:

Photo Factfile:
  • Shutter: 12 Minutes
  • Aperture: f 13
  • ISO 100
It's clear that I didn't allow the camera long enough to collect enough light detail to show the star trails in this photo, the aperture is too small and the ISO number is too low to give sufficient brightness to the photograph.
For the next photograph I decided to change lots of camera settings so that I could get a result which would at least show some of the night sky to me, so here we go...

Attempt 2 (Same night/Location)
For this attempt I also moved the camera to face up the trail I was standing on in the direction of the North Star, here is the resulting photograph:

Photo Factfile:
  • Shutter Speed: 17 Minutes
  • Aperture: f5
  • ISO 100
For this exposure I increased the shutter speed slightly but the drastic change came when I changed the aperture to f5, which gave the picture much more detail in the given time.
Unfortunately this brings forward another problem of focusing in the composition, the foreground silhouette isn't in focus and is obvious when you look at the photo in a larger frame, this is unfortunate as the star trails are evident and would look good with a going over in Photoshop, to enhance the exposure of the image.

However, I did have a go at editing the image in Adobe Lightroom to see how I could improve it through basic alterations in exposure contrast etc...
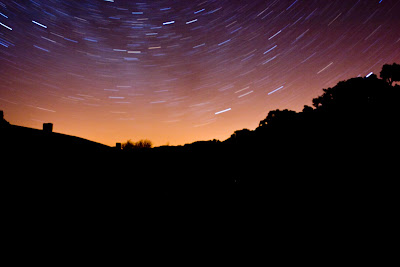

I have used the 'Develop' Module in Lightroom to add some alterations to the photo, as shown in the screen shot on the right, I have increased the exposure to bring out stars which are not visible in the original exposure.
I also increased the contrast in the photograph to give some depth to the sky and make it look more realistic.
As for sharpening I did add some to the photo, but I can see that I cannot introduce sharpness to the edge around the black silhouette which is unfortunate and rather annoying, as the photograph looks good for a first attempt at night photography.


Below is another photograph which I took at Two Bridges, but I decided to try a different composition by zooming into the North Star from the ground to get a direct rotation around it without any other distractions in the image

Photo Factfile:
  • Shutter Speed: 14 Minutes
  • Aperture: f4
  • ISO: 100
The photograph is under exposed and does not show many star trails in it's original format, so I decided to work with it in Lightroom and see if I could develop the star trails into a presentable photograph, here is the result below with steps on how I achieved the effect.
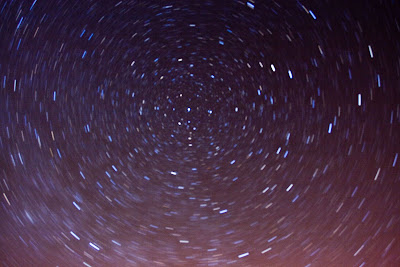

The screenshot below shows some of the alterations I made to the image to bring out some more of the underlying details.

Exposure
To give the image more detail, I decided use the exposure slider to expose some more of the detail within the photograph.
I moved the slider to +2.76 over the original exposure which brought out much more detail in the sky and stars themselves, but I also had to consider how this would affect other aspects of the photograph.
Contrast
I increased contrast in the photo to a dramatic extent as I wanted to create depth in the photo from the stars to the expanse of outer space behind them, I believe that adding contrast to the image has given me this effect.

Sharpening
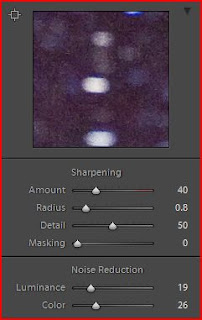
RAW files from Canon digital cameras tend to be saved as relatively soft images which need work to recover the original sharpness given by lens lens mounted, to recover any lost sharpness, I used a preset 'Landscape' sharpening mode in Lightroom to give me the final result seen above. The exact alterations for the sharpening are shown in the screen shot on the right.

Shoot Evaluation

As for the shoot and editing as a whole, I feel it went well for a first attempt and I discovered that shooting outside at around midnight is very different and much more challenging than shooting during the day at a location as it puts much more strain on all of the equipment, for example, the lens starts to steam up and batteries start to run out more quickly because of the cold.

Photographs
Shooting was challenging because of the reasons I mentioned earlier, but other reasons also made the shoot difficult for me, I have listed some of the reasons below with descriptions:
  • Lack of Light - I couldn't see any of the stars through my viewfinder, so lots of the composition was up to checking immediate foreground subjects against stars in the sky and checking the angle at which the star meets the subject.
  • Focusing - This is difficult as it requires a great deal of skill to measure how far the foregorund subject is from the camera to make sure the subject is in focus and the stars are in the right position behind the subject.
  • Lens - The lens was subject to steaming up as it was warmer than the air around it, unfortunately there really wasn't much I could do about it until I had completed each individual capture.
Good Points!
The shoot gave me a much needed experimental period where I could try out some techniques and angles I have looked at in my research to date, I enjoyed being out in the countryside shooting a scene which is very un touched by humans and in some cases, undiscovered, even when I was out shooting I saw some shooting stars which I have rarely seen before now which made the trip even more interesting for me and persuaded me to stay for more time.

Photographs shot by: Matt Thorne 2009

Monday, 2 March 2009

Ongoing Research (Night Sky)

To give my project more depth and detail I have decided to trawl the internet and any other media source to find relevant photography which appeals to the style of photograph I want to produce as a final image, these are some of the sources I have found so far:


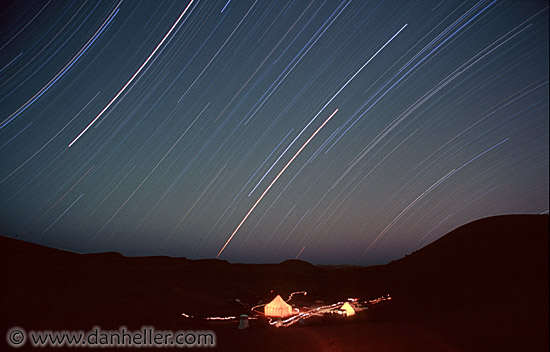
This photograph shows another way of shooting star trails, without using Polaris (The North Star) or Sigma Octantis (The South Pole Star) as a focal point as such in the background, as a result it gives sweeping trails of starlight which sweep according to each star rotation ( The rotations are clear in the photograph which was taken in Morocco, close to the equator).

Photo Fact File
  1. Shot in Morocco
  2. 3 Hour Exposure
This photograph shows how the night sky changes depending on where and when the photograph is shot, as I will achieve different results here in Devon, than this photographer has done here in Morocco, much nearer to the equator than I am. Although I am finding it quite interesting to see how photographs vary when taken in different parts of the world, maybe I will be inspired to travel to these locations and try for myself :)
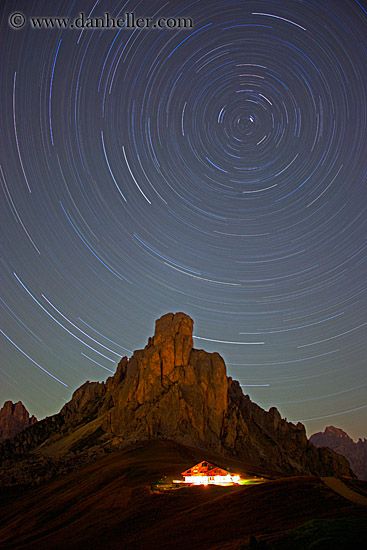
The next photograph was taken in Italy, looking up at Polaris from (allegedly) a hotel room window in Alto Adige, Northern Italy.

It shows a chalet style building in the foreground with a large outcrop of rock in the background, which is lit by light from the chalet and from the night sky.

The photo was taken over a three hour period which is evident due to the rotation shown in the background, the viewer is drwan into the swirling stars by the chalet which first grabs your attention, then the eye is led up the rock into the stars above.

I could produce a photograph featuring th rotation of stars around Polaris in Devon so it is quite likely that my photographs will look like this one in terms of background stars, foreground subjects may be less dramatic as I simple do not have an outcrop of rock like this to work with in Devon unfortunately.

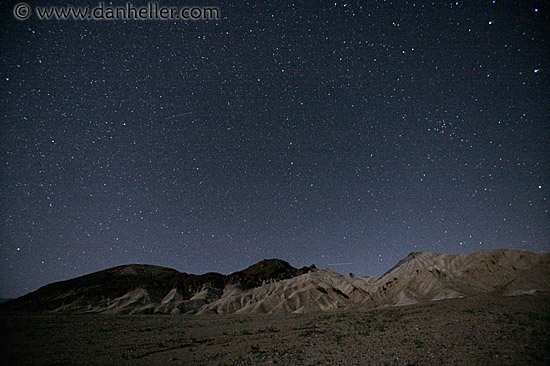
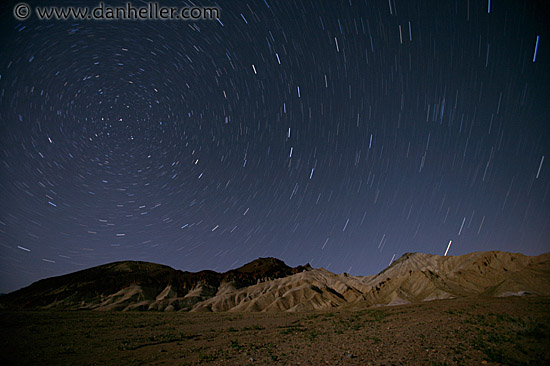
These next two images show how length of exposure time can vastly change how the star trails appear, if at all. Depending on the effect you want to achieve, shutter opening time has to be considered with ISO setting to set the camera up correctly, have a look at the two examples:

The first image was taken for 25 Seconds while the second image above was taken for a period of 15 minutes.
The effect is clear in the way the stars appear to have rotated on the longer exposure to give effective star trails which show the path of the stars.
As I continue to work through the project, I will experiment with the shorter and longer exposure times to see which effect I prefer.

Images sourced from: www.danheller.com

The Night Sky

As my ideas change and time progresses, I have decided to move towards the idea of photographing the night sky, as I have always had a fascination for the stars and how they can potentially make an interesting photograph, but haven't really had much of a chance to get out there and shoot some late night photos which show either the stars in their purset form, or with civilisation as a backdrop.

To assist with my quest for some excellent photos, I decided to carry out some online research of my own to see how other photographers have photographed the night sky.

I decided to search with Google and see what I could find and came across a website called Dan Heller Photography (www.danheller.com) which hosted photos taken by many amateur and professional photographers from around the world.

I found this example of an amazing photo taken from Mt. Kilimanjaro in Tanzania which is shown on the right.
This photo was originally shot on Fuji Velvia film which brings forward the argument of which medium I should use for the final images; I will discuss this in more detail at a later date.

Fact File
  1. Canon EOS 1v Body
  2. EF 17-35mm f2.8 lens (@17mm/f2.8)
  3. Velvia film (rated at 40ASA)
  4. 3.5 hour time-release exposure
As for one of the first images, I can see that this effect will take lots of skill and determination to achieve, but I set a photo like this as a target for myself over the next few months; obviously some factors cannot be undertaken, such as the climb to the top of Mt. Kilimanjaro, or perhaps the ability to conduct a 3.5hour exposure, although the latter may be possible before the submission date.

Photograph Analysis
In my own opinion, this photograph is amazing, it shows sheer determination by the photographer to produce a decent photograph and I believe I can produce a high quality piece of work which will compare in quality, to this photo.
I can immediately see that perseverance and skill are required to produce a result which will be suitable for show in the summer so I will need to get out there ASAP and build up my own skills ready to shoot some final images which will wow my lecturers and coursemates.

Composition
This photo is well composed as it features several items in the foreground while having an amazing backdrop of the star trail, the photo follows the same rules as the photographer would follow during the day for a day time composition,regarding where the tents are positioned, almost in a 'visual pathway' which leads the eye into the enormity of the star trail behind.

Sunday, 1 March 2009

My Project Proposal

For my Major Study Project, I propose to shoot images which show the massive expanse of the sky above the Earth.

What will the photographs feature?
Each photograph will feature the night sky on a clear night so that the stars can be seen above the foreground object, which will be a very prominent structure, either man-made or a natural landform. The foregorund object needs to be able to link to the stars above by almost pointing the viewer's eye up into the sky above, which will contain a beatiful vortex of swirling stars.

How will the photographs be shot?
I will shot the photos using my digital SLR camera and possibly a film based camera (more about this in the 'equipment' blog entry), with a remote shutter release which allows me to shoot the photo for an unlimited amount of time, giving me some amazing star trails above the foreground subject.

How many images are to be produced?
I will produce as many of these images I can, but unfortunately this technique's productivity is largely based on the quality of the evening I go out, if it is cloudy, I won't get any photographs, it's as simple as that. However, I can still use this time to perfect my locations and subjects which i want to photograph when the sky is clear, as it has to be clear several times between now and the end of this project.
As a number of images I expect to produce, I want to get around 2-4 images of a very high quality which will be good enough to present in the Summer Show in July 2009.

Why do I want to do this?
I ahve had a keen interest in astronomy since I was younger so this project gives me the chance to get out there and capture the night sky in a mysterious way. Star photography is very much a play with lighting as the stars act as little spots of light which rotate in to an amazing vortex effect if you stay on location for long enough. Many amateur photographers have had a go at this and clearly have improving skills as they have progressed, so I want to try my best to become skillful at this technique and eventually share my technique with other people too.

Major Study

I am going to use this blog to present my development of new ideas leading up to the final presentation of my work for the Summer Show in June 2009.

The blog will take you through all of my:

  • Experimentations

  • Background Reading

  • Equipment Lists

  • Technique Write ups

amongst many other things which will come together to form my Major Study project to later be submitted to Plymouth College of Art as part of my Foundation Degree in Photography.

As for an idea for the project, I have given it a considerable amount of thought since my lecture group were told about this project just before Christmas 2008. During the Christmas break I decided to have a bit of a brainstorm about possible ideas I could persue for the duration of the Major Study project.

To come up with some ideas, I decided to make a list of criteria that the idea had to meet, these are:

  • Relevant to my own personal interests
  • Inclusion of new techniques previously untried
  • Potential of background research into techniques or subject studied
  • Allow me to express my own skills and personality through the photographs I produce
I want all of my ideas to take into account, these specific requirements which I have set myself for the Major Study project.

Ideas

Local Life
This idea would involve me utilising my local knowledge in Devon and travelling to events around the area, where I would shoot photographs of selected activities at each of these events, showing the care and attention which has gone into organising the event, along with some of the attending public who are enjoying the event.

Local Produce
For this idea, I would aim to visit several local food producers and photograph the 'making' of the product from the start to finish and then present these photographs as a series, depending on how shoots went at different locations, I would need to decide whether all of my photos would be sourced from the same location of whether several locations could be linked together.

The Night Sky
For this idea, I will shoot photographs which include the night sky as a working part of the photograph. In the past I have seen photographs where the photographer has used the stars to create 'circles of light' above relatively plain objects, but due to the long exposure of the photograph, the object has been lit in an unusual way, as lighting comes from sources scattered throughout the immediate landscape and from above.