Choosing a good location for my first outing proved difficult, as I currently live in a very built up area in the centre of Plymouth, so simply walking out into the back garden would result in a poor photo being taken due to the large amount of light pollution which would result in the photo.
I gave thought to the idea and decided on a good place to start my star gazing photographs and I came up with Two-Bridges, near Princetown on Dartmoor as a good location
Here is a map showing Two Bridges and Plymouth:

As you can see, it is a fair drive from the centre of Plymouth, around 30 minutes, but I considered it worthwhile to try out some of the techniques and ideas I have looked at.
Equipment
As for equipment, for this shoot I decided to take the following with me:
- Canon EOS 400D Digital SLR Camera
- Canon L USM 17-40mm Wide Angle Lens
- Manfrotto Medium Tripod 055XPROB
- Remote Shutter (Cable Release)
- Cloth to wipe the lens
- Spare Battery (If available)
- Many layers of clothing
For this particular shoot I decided to use my digital camera as I want to go and have a go at the techniques I have looked at, just to get a feel for how to work under the cover of darkness and also how my camera would fair in the much lower temperatures of the night and see if it is resistant enough to be useful for the project as a whole. In the future I may decide to take a film camera out and test conditions and shooting capabilities with a more basic film camera, to get the feel with that one too.
The Lens
I have opted to use my wide angle L lens for this shoot as it is the best quality lens I own and should give me the sharpest and most accurate interpretation of what I can see with my own eyes at night.
Remote Cable Release
This is essential for night photography as many of my photographs will exceed the 30second limit in place on my camera, with the remote I can set the camera to 'Bulb' mode and essentially leave the shutter open for an unlimited length of time, provided the battery lasts, but this remote will allow me to leave the camera unattended while it takes a photograph for many minutes to capture much more light detail.
The right Tripod
It is also important to use a good quality tripod as it needs to remain very still and sturdy during an exposure. Unfortunately any movement at all can ruin the sharpness of a photograph instantly rendering it useless for editing or further improvement afterwards, so I will be using my Manfrotto tripod for every photo shoot.
Battery
It is important for me to have a fully charged, warm battery to use when I'm out shooting the photos as the camera will require a long period of battery life to finish shooting the photos I want.
Time
I left Plymouth at around 12:30AM and arrived at Two Bridges at around 1AM which gave me complete darkness in the sky without any light pollution, or at least it appeared that there was none above me anyway.
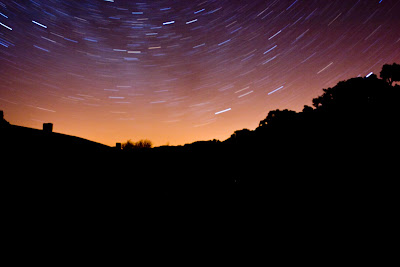
I proceeded to set up my equipment on the tripod while paying particular attention to the small clouds floating above me hoping that they wouldn't stay around too long. Eventually I had my camera mounted on the tripod with the remote cable connected and ready to go, so I aimed the camera towards the sky looking north towards Polaris.
Here is the first photograph I shot on location, in JPEG format:
 Photo Factfile:
- Shutter: 12 Minutes
- Aperture: f 13
- ISO 100
For the next photograph I decided to change lots of camera settings so that I could get a result which would at least show some of the night sky to me, so here we go...
Attempt 2 (Same night/Location)
For this attempt I also moved the camera to face up the trail I was standing on in the direction of the North Star, here is the resulting photograph:
 Photo Factfile:
- Shutter Speed: 17 Minutes
- Aperture: f5
- ISO 100
Unfortunately this brings forward another problem of focusing in the composition, the foreground silhouette isn't in focus and is obvious when you look at the photo in a larger frame, this is unfortunate as the star trails are evident and would look good with a going over in Photoshop, to enhance the exposure of the image.
However, I did have a go at editing the image in Adobe Lightroom to see how I could improve it through basic alterations in exposure contrast etc...

 I have used the 'Develop' Module in Lightroom to add some alterations to the photo, as shown in the screen shot on the right, I have increased the exposure to bring out stars which are not visible in the original exposure.
I also increased the contrast in the photograph to give some depth to the sky and make it look more realistic.
As for sharpening I did add some to the photo, but I can see that I cannot introduce sharpness to the edge around the black silhouette which is unfortunate and rather annoying, as the photograph looks good for a first attempt at night photography.
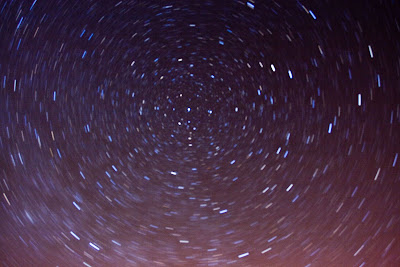
Below is another photograph which I took at Two Bridges, but I decided to try a different composition by zooming into the North Star from the ground to get a direct rotation around it without any other distractions in the image
 Photo Factfile:
- Shutter Speed: 14 Minutes
- Aperture: f4
- ISO: 100

The screenshot below shows some of the alterations I made to the image to bring out some more of the underlying details.
Exposure
To give the image more detail, I decided use the exposure slider to expose some more of the detail within the photograph.
I moved the slider to +2.76 over the original exposure which brought out much more detail in the sky and stars themselves, but I also had to consider how this would affect other aspects of the photograph.
 Contrast
I increased contrast in the photo to a dramatic extent as I wanted to create depth in the photo from the stars to the expanse of outer space behind them, I believe that adding contrast to the image has given me this effect.
Sharpening

RAW files from Canon digital cameras tend to be saved as relatively soft images which need work to recover the original sharpness given by lens lens mounted, to recover any lost sharpness, I used a preset 'Landscape' sharpening mode in Lightroom to give me the final result seen above. The exact alterations for the sharpening are shown in the screen shot on the right.
Shoot Evaluation
As for the shoot and editing as a whole, I feel it went well for a first attempt and I discovered that shooting outside at around midnight is very different and much more challenging than shooting during the day at a location as it puts much more strain on all of the equipment, for example, the lens starts to steam up and batteries start to run out more quickly because of the cold.
Photographs
Shooting was challenging because of the reasons I mentioned earlier, but other reasons also made the shoot difficult for me, I have listed some of the reasons below with descriptions:
- Lack of Light - I couldn't see any of the stars through my viewfinder, so lots of the composition was up to checking immediate foreground subjects against stars in the sky and checking the angle at which the star meets the subject.
- Focusing - This is difficult as it requires a great deal of skill to measure how far the foregorund subject is from the camera to make sure the subject is in focus and the stars are in the right position behind the subject.
- Lens - The lens was subject to steaming up as it was warmer than the air around it, unfortunately there really wasn't much I could do about it until I had completed each individual capture.
The shoot gave me a much needed experimental period where I could try out some techniques and angles I have looked at in my research to date, I enjoyed being out in the countryside shooting a scene which is very un touched by humans and in some cases, undiscovered, even when I was out shooting I saw some shooting stars which I have rarely seen before now which made the trip even more interesting for me and persuaded me to stay for more time.
Photographs shot by: Matt Thorne 2009

No comments:
Post a Comment