This program allows me to quickly find and images either in Jpeg or RAW file format, then edit them in ease, by using simple sliders to change exposure, contrast and among many other things.
Layout
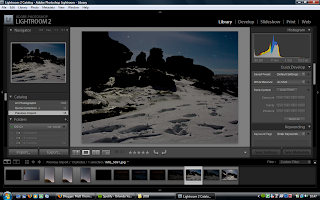
The program is laid out into five tabs which allow you to do different elements of editing or filing by clicking each of the headings.
The headings are:
- Library
- Develop
- Slideshow
- Print
- Web
The program layout is shown in the print screen image below:
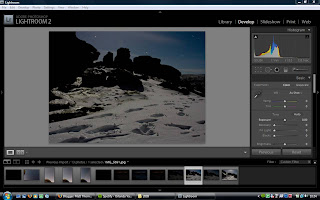
 The program is very easy to navigate as the bottom bar features the photos within the import folder you are viewing and all folders are easily viewable in the left hand window. As for developing the images, quick develop options can be used but the full options are only available when you click the 'Develop' module at the top of the screen:
As for the features in the Develop tab, I can do all the basics such as change Exposure, White Balance, Contrast, Brightness etc... some of the alterations can be seen in the print screen image above.
Lightroom is the perfect tool for simple image editing, if the image itself doesn't need a great deal of deep editing (changing subjects, cloning subjects etc) then Lightroom is the ideal tool to give the image you are editing some more presence and vibrance.
However if you wish to do more complex editing to an image, you'll need to use Adobe Photoshop which is discussed below.
Adobe Photoshop
This program is more advanced than Lightroom as it allows you to not only change the basics of the image light Lightroom will, with the built in Adobe Camera RAW program, it will also allow you to edit subjects within the photograph, for example move a signpost or a person to a different location, or get rid of them completely, which can be useful when you cannot shoot the photo without these subjects being in the frame.
The print screen below shows the Adobe Camera RAW program which can be used to make minor adjustments to the image before continuing to make changes to the photograph in Photoshop itself:

 When you have finished making changes to the file, you can either save the image and not proceed to Photoshop, by clicking the 'Save Image' button on the bottom left, or proceed to Photoshop by clicking 'Open Image' which will then bring you to the next srceen, shown below:
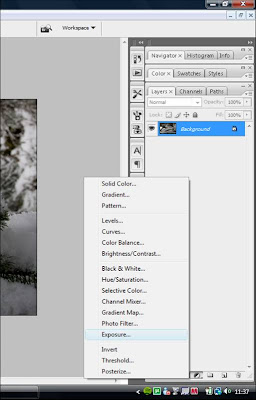
 Many options are available on the right hand side to edit basics in the photograph, although there are many, more photography specific options in the layers tab shown on the right.
These different options all create an adjustement layer which sits over the top of the background image, none of them permantly change the background image, all they do is take the information from the image and then change as per the options selected by the user.
The different adjustment layers allow me to change contrast/exposure and gradients amongst many other very useful alterations.

No comments:
Post a Comment