Friday, 27 March 2009

Vincent Van Gogh and his artwork

He may not instantly come to mind as relevant to my studies but, in reality, he has produced work which considers the same ideas I am looking at right now, around a hundred years ago. Feelings about the expanse of the sky at night are presented in his painting in just the same way as photographs present this large amount of space.

The first painting I want to look at, is this one called 'Starry Night over the Rhone'. The Rhone is a large river which flows through France among other European countries, so it is a very important water supply for the area.

Photo sourced from: http://entertainment.howstuffworks.com

The town shown in the foreground is called Arles and directly above the town is the 'Big Dipper' a constellation which is Normally found in Northern facing skies, although Van Gogh has used his artistic license to move it to where he wants it.

Unfortunately I haven't got an 'artistic license' when it comes to shooting my photographs; I have to shoot what is present in front of me, it is only later that I can make adjustments to content and composition using Photoshop, which I discuss in the 'Photoshop and the stars' blog entry.

Anyway as for composition in the photograph, he does use the same type of rule that I wish to use in my upcoming photography, which is to have a close initial foreground interest (the people) to grab the viewer's attention, which then feeds the eye to the town in the background,then up into the sky to see the amazing stars above. This is exactly what I want my photographs to contain; a pathway which leads the viewer into the sky instead of jsut a flat image without any depth.

Here is another painting by Van Gogh, called 'Starry Night' which was produced in 1889 showing star trails in the style of Van Gogh. It is a truly amazing painting with lots of colour, even though it is showing a night scene which is normally void of any colour. Again he has used foreground interest in a village to capture the viewer's eye, which is then lead up into the sky where stars are presented as large yellow circles of colour.

Image sourced from: http://www.vangoghgallery.com/painting/starryindex.html

I can learn things about composition by looking at how Van Gogh has composed his paintings and also the messages which are conveyed in each of these particular paintings.
They help me to understand how to keep the viewer interested and create a pathway as shooting an image of just the sky above, would not have sufficient content to keep the viewer interested for long, although a photograph of the stars would be good, it simply wouldn't have any place on Earth and wouldn't make a comparison between the very social planet on which we live and the lonely area above us which is space.

Van Gogh is pushing the idea that the night time is just as colourful as the day time, which is why I insist on shooting colour images at night even when many may think there simply are no colours to capture. I completely disagree with the normal statement as there are colours to capture at night, you just need to be patient and allow them to appear as the softly lit foreground comes alive with colours.

Wednesday, 25 March 2009

Arnoud Quanjer - The Night Sky / Wildlife Photographer

Photographer Profile

Arnoud Quanjer

Quanjer is a well known wildlife photographer who operates from the Netherlands but spends much of his time out in the wilds of Africa shooting photographs, while he is primarily a wildlife photographer, he does occasionally turn his hand to star trail photography which results in some excellent photos as I have uploaded below from his own website.

Unfortunately Arnoud doesn't give any details about how long each photograph has taken to expose or any details of Aperture or ISO number used.
However, the images themselves are still useful to me as they allow me to see how other photographers have composed the foreground with Polaris in the background. Looking at the first image of Arnoud's which I have included above, it appears that he has gone for a different composition which doesn't include Polaris but just the stars which rotate around the periphery of Polaris.

Composition
The composition is more effective in the photograph from the Gemsbokplein Center than Augrabies as it features lone foreground subjects (the two trees) which give an incredible depth to the image, showing objects very close to the photographer, and ones which are many miles away giving the image a certain technical feel to it.


Again no details about shoot settings are given for these two photographs but they do provide good examples for me to work with and try to produce an image using the techniques I can see in use here.

Composition
As for composition, the first image lacks any punchy foreground subject in favour of a more general outlook across the landscape which i think reduces the visual impact of the image as a whole and makes the rather good star trail above, go to waste.
On the other hand, the image below it does have some closer foreground interest in a tree lit with red light, which gives an interesting light setup for the image. The star trail sits about about the right exposure behind the trees in the foreground completing the image.
I like the way the trees are lit differently than with natural light as it gives the image more mystery just like the star trails give as a result anyway.

To help me with my developing techniques for these photo shoots, I have included a guide which Arnoud has written for his website, it includes lots of details about how to shoot a star trail and also how to save it as a final image when complete, he does also discuss Stacking images at the end which I will go through in more detail later.

Exposing your star trail
Augrabies National Park (1 hour exposure)

When you shoot your first star trail picture it's easy to get too enthusiastic and immediately go for very long exposures. If you use long exposures you get long star trails and that's exactly what you want right? Under perfect circumstances that is correct, unfortunately the circumstances are hardly ever perfect. In most parts of the world there will be cities nearby and this ambient light in the sky can ruin your picture if you expose for too long. The light that your eye sees can pick up is nothing compared to the sensitivity of a digital sensor. The ambient light that the sensor picks up during a long exposure can be so overwhelming that you don't see any stars at all in the resulting picture. Another thing that can ruin your star trail is the light that the moon reflects. When the moon is full you can forget about taking any star trail pictures, the reflected light from the moon will be much too bright. Another thing that can ruin star trail pictures are clouds. Ideally you want to make star trail pictures on a cloudless night as clouds reflect lots of light. If the clouds are not too dense then they might give an interesting effect in the resulting star trail, but in general they just ruin the shot.

To sum up: it's best to shoot star trails on a cloudless night, far away from cities and either when the moon hasn't risen yet or during a new moon. From my experience I can tell you that these three conditions unfortunately seldomly coincide :(

Composition

One of the most important things in star trail photography is composition. A picture of just star trails doesn't make for very interesting picture. For a star trail picture to be aesthetically pleasing you need to find an interesting foreground object like a tree, a formation of rocks, a house or whatever else you can find. If you're shooting under perfect circumstances (no moon, cloudless night and no ambient light) then getting the foreground object correctly exposed can be a problem. Under these circumstance the foreground object will not reflect enough light and will thus look a bit dull in the resulting picture. If this is the case then you can experiment a bit during the exposure. You can for instance use a torch or a flash gun to extra expose the foreground. It takes some practice to get the exposure right, but once you et a feel for how long to expose the forground object you can get amazing shots. You can also experiment with different colours of light by using filters.

Setting the focal distance (focusing)

When setting up your camera you need to make sure that the foreground object and the trails are in focus. Depending on how far the foreground object is away from you this may mean that you need to select a small aperture to get the whole scene in focus. I generally select a foreground object that is at least 5-10 meters away from me and I shoot using a wide angle 10-22mm lens on my DSLR (16-35mm equivalant for normal 35mm cameras). Using wide angle lenses getting the whole scene in focus is usually not an issue as the infinity mark is usually close to the lens. Ideally you'd have to set your camera to focus near the hyper focal distance of your lens. The hyperfocal distance is defined as "the point of focus where everything from half that distance to infinity falls within the depth of field.". What this means in laymans terms is that at every aperture every lens has a distance setting that produces the greatest depth of field. Landscape photographs are often taken with the lens focused at the hyperfocal distance; near and distant objects are sharp in the photos. This also works for star trails as you're usually also working with wide angle lenses when taking star trail pictures. Normal to wide-angle lenses are good lenses to use for star trail photographs as these lenses all have a relatively short hyperfocal distances even when set to small f-numbers (large apertures). A 16mm lens set to f/2.8 for example has a hyperfocal distance of around about 4,80m. This means that everything from 2,40m to infinity will be sharp in a photograph taken with this lens focused at the hyperfocal distance. This also means that focussing further away, for instance at the horizon or a distant tree, is useless. Determine the hyperfocal distance of your lens before you take the shot and focus at half that length. It's probably a good idea to calculate the hyperfocal distance at the various apertures for your lens of choice and write them down before you go on a trip.

When you determine the hyperfocal distance of your lens it's important to take into effect the extension factor of your camera if you're using a DSLR. If you're for instance using a 24mm lens on a Canon 30D then the 35mm equivalent of the lens will be a 38,4mm lens as the 30D has an extension factor of 1.6x. You can use one of the many available online hyperfocal distance calculators to calculate the hyperfocal distance for your lenses on the various aperture settings.

Circular strips or trails?

When you set up your tripod for a star trails picture you should consider the kind of trails that you want to show. If you're on the Northern hemisphere and you point your camera North then the stars will make circular trails. In the Northern hemisphere you can find North by locating Polaris. If you want to make circular star trails in the Southern hemisphere then you need to point your camera to the South. In the Southern hemisphere you can find South by using the "Southern Cross" constellation. When you have found the Cross and the Pointers, take an imaginary bisector of the pointers and extend this line. Now draw another imaginary line through the long axis of the cross and extend it. Where these two lines meet is Celestial South Pole. By dropping a line from the celestial South pole to the horizon will give south. It appears difficult, but once you have tried it, you will see how easy it really is and with a little practice you can simply look up at the Pointers and Cross and find South immediately. If you don't want circular trails then point your camera away from the Southern Cross or Polaris and you'll get stripes instead of circles. You can find a number of examples in the photo gallery at the end of this page.

Getting the Horizon Straight

Hama Double-Bubble Spirit Level

Obtaining focus at night can be extremely difficult. In your viewfinder you will struggle to see any stars, and if you see a star then obtaining focus on it will be near impossible. As I use a wide angle lens my infinity focus point is pretty close to the lens which gives me the opportunity to use a torch to light illuminate an object close to me so I can focus on that . As the foreground object as far as my lens is concerned is as far away as the stars (eg beyond the infinity focus of the lens) getting the foreground object in focus will make sure the stars are in focus. Besides getting the focus right I've found that it is extremely difficult to get the horizon straight in nighttime pictures as you can't really see the horizon. I've solved this problem by using a Hama Double-Bubble Spirit Level which fits the flash hot-shoe of my camera. Using this spirit level it's extremely easy to see if the camera is level.

Noise Reduction

If you are shooting digital then there are a couple of settings that you need to check. If your camera has got an option to reduce noise by performing a 'black-frame subtraction' then you need to turn this function on. This will dramatically reduce noise in the picture. You also need to select your lowest ISO number to reduce noise. Most camera's offer a 100ISO mode and some professional DSLR's even offer a 50ISO mode.

Battery Power

Most camera's use battery power to keep the camera's mirror up during a long exposure. This means that your battery will drain during the shot. You need to make sure that the battery doesn't run out while making the shot because that would mean that the image is not saved to your memory card. If you've enabled 'black frame subtraction' then you also need to take into account that after you take the picture the camera will take another picture for performing the black frame subtraction. The exposure time of this black frame subtraction picture is identical to the initial exposure. This means that if you make a one hour exposure that the camera battery will need to last for two hours! Always use a fully charged battery when making star trail pictures!

The most important thing in star trail photography is practice, practice, practice! I've only recently started making star trail pictures and I learn from every picture that I take. I hope that I'll get it right in a couple of years.

Stacking Images

A while ago I read about another technique to make star trails on the Internet. In this technique not a single long exposure image was made, but a series of short exposures which were then stacked and turned into one star strails image. In this technique you make exposures of around 30 seconds using the Tv mode on your camera and a remote release. You set the camera to continuous shooting and shoot as many pictures as you want. When the camera has exposed for the set amount of time the shutter will close, but because the camera is in continuous shooting mode and the remote release is still engaged a new image will be made instantly. I tried out this technique in Africa in January 2008 and found out that it has some distinct advantages, but also some nasty disadvantages.

On of the main advantages of shooting a series of relatively short exposures is that the noise is reduced by a drastic margin. If you use long exposures you'll need to use the in-camera noise reduction because otherwise you'll end up with too much noise. Using short 30 second exposures the noise problem is not that bad. Another advantage of shooting a series of images is that you can let the camera take pictures until the battery dies. When it dies you'll lose only the last picture, but the rest will already be stored on your compact flash card. When you're taking long exposure star trails you'll lose the complete star trail picture if the camera runs out of juice. There are also some disadvantages of using this method though. Most DLSR's can perform automatic noise reduction when using long(ish) shutter speeds. What the camera does is it takes the image and after the shutter is closed is takes another picture using the same exposure time. This image will be substracted from the original image thereby removing non-image artifacts like hot and cold pixels and static interference. The drawback of noise reduction is that with cameras you can't take a picture while the camera is performing the noise reduction. This means that if you take 30 second exposures for your startrail that you will miss 30 seconds each shot. This leads to visible gaps in the trails. This means that you need to turn off noise reduction if you want to use the multiple images stacking technique.

The biggest drawback of this method for me is that if you shoot in a situation where you don't have a lot of light illuminating the foreground that you can't get a properly exposed foreground. I made a one hour star trail using 30 second exposures and was not impressed with the result. I probably have the ultimate camera for using this technique as I use a Canon 1D Mark III which can perform noise reduction while taking pictures, but I was not impressed. The results I've gotten using long exposures are infinately better. I think that this technique of stacking multiple images will work like a charm with objects that are brightly lit, for instance the sky line of a city, but in near total darkness it doesn't work for me. If you have another opinion and have succesfully used this technique please drop me an e-mail to let me know.

Photographs and guide sourced from: www.wildlifephotography.nl

Saturday, 21 March 2009

The Monument - Warren House Inn 19th March 09

It has been a week or so since my last photo shoot when the snow had fallen on Dartmoor. Anyway for this shoot I decided to try another location near the Warren House Inn which featured an old cross carved into a Granite rock insitu, I considered the monument as a good composition for my star photography and headed up there on the evening of the 19th March to see what I could get.

I waited for night to fall and headed up to the location at around 9PM to set up my equipment and get ready for the very chilly night ahead as the temperature was expected to fall below freezing, but it didn't stop me in the search for an excellent photograph.

Unfortunately I do not have the original test shots I did for the composition but this diagram below gives an idea of how I composed the photograph:

I wanted the monument to point towards the stars above, but unfortunately when I got to the location, I realised that the cross detailing was facing West to East while the stone carving was very much a flat surface looking South to North which is the direction I need to face the rock and the stars above.

Due to the rock's close proximity to the main road, I had to compose the North Star to the right of the rock to try to avoid any lens flare from any oncoming headlamps, although I did expect the traffic flow to be minimal at this time of night.

Anyway as my composition was ready, but before starting a long exposure and after learning lessons from my previous shoot, I decided to run a few test shots and see how the photo would turn out by using higher ISO numbers.

The first test shot I did was at these settings:

Shutter Speed: 5 minutes
Aperture: f10
ISO: 1600

I do not currently have the sample image for this set-up but it did give me a good result, I could clearly see the stars above and they did begin to rotate around the monument within the five minutes the photo was taken for. From this example I decided to do the maths and set the camera up for a longer exposure this time, so here are the workings:

So I had a correctly exposed image at ISO 1600 for five minutes

ISO|Timescale
100 80 minutes
200 40 minutes
400 20 minutes
800 10 minutes
1600 5 minutes

With this information I could accurately choose an exposure time without the worry of it being over or under exposed, unless for an uncontrollable reason, the lighting changes, but for now I chose to go with ISO 200 for 40 minutes.

Why was this chosen?
I went with this option because the lower ISO number should result in less noise in the photograph and a much higher quality capture which is much clearer with longer star trails than the five minute exposure.

Noise can easily ruin a star trail photograph when shooting digitally as the camera tries to 'work out' the colour which is in dark areas of an image, although while doing this, the camera introduces patches of red, green and blue into areas that may have more light if shot on film, but should really be left as a dark patch in a digital file. However the effects of this can be reduced by shooting the image in a low ISO setting on the camera.

Anyway now it's time to see how the long term capture came out, here it is below:

Here is the result after 40 minutes of waiting, and here's my thoughts on the picture:

Lighting
The image itself is fairly under exposed but this can be rectified with a little bit of Photoshop work just to boost the exposure so the monument stands out but I also want the stars in the background to stand out with contrast bringing them out from the darkness of the sky behind.

Composition
I am happy with the composition in this image as it feeds the viewer's eye from the base of the monument up to the tip, which then points the viewer's eye towards the star trails and centre of the vortex.

I have given consideration to the composition as it is important for it to follow some form of rule rather than just feature stars and a foregorund subject, the two different parts of the picture need to link to each other and tell a story to the viewer.

I would have liked the monument to be facing the right way so the cross was evident, but this couldn't happen as the cross faces the wrong way and I could not move too far around the subject as the headlights in the photograph would have been too much of a distraction.

The car headlamps
These have been a basis for debate on this photograph as I have asked several people what their opinion is of having them in the photograph, in my own opinion I like the car headlamps in the photo as they show mans connection with the landscape, in both the car headlamps and also the stone carving which has been carved by man many years ago. But it also shows how we have almost no presence in outer space and that the sky above us is almost completely unknown to us, although we look up at it with familiarity in terms of seeing different constellations and the moon up there.

Development since the last photo shoot
Since the photo shoot on the 5th March near Hound Tor I have changed my approach to each photo shoot, I now make sure to shoot sample images initially as soon as I have composed the image I like, this then helps me to work out exactly how long a high quality exposure will take to expose.

I have also learned to take more care over the composition itself and make sure that my previous skill in daytime landscape photography come into this project to help me choose correct positioning for the foreground subject and the background, by using the 'Rule of Thirds' and also my own photograph skill.

The Rule of Thirds
A very simple photographic idea which basically means dividing up the composition into thirds, so you end up with two lines drawn horizontally and two vertically, evenly spaced, featuring parts of the images in each small portion. The important areas are where the lines cross as these areas signify good places to position subjects or lines/points of interest.

Tuesday, 10 March 2009

Location of Polaris

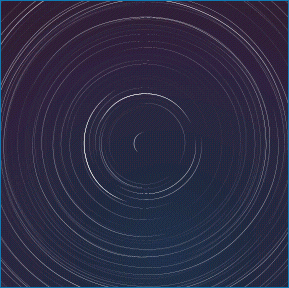
To shoot many star trail photographs, it is important to understand where The North Star is in our night sky, the following blog entry explains where it is, you should then go and see for yourself :)This photograph is shot for a period of 8 Hours and shows the theoretical location of the North Pole; Polaris is shown in the small crescent shape to the left of the central point as it isn't placed at the directly above the North Pole, it is in fact around 1 Degree from the 'Northern Celestial Pole'

Sourced from: http://www.glyphweb.com/esky/stars/polaris.html

How to find Polaris?

The diagram above shows how to find The North Star quickly and easily by initially finding 'The Plough' or 'The Big Dipper' in the sky, then follow from the front of the 'scoop' at the same angle at whcih the scoop resides, until you reach Polaris, which will appear to have few stars surrounding it if you look closely enough. You ve found it! :)

Image sourced from: www.wikimedia.com

Sunday, 8 March 2009

Photoshoot near Hound Tor 5th March 2009

Recently we have been having some fairly unusual weather, some incredibly deep snow fall particularly over high land areas and even some snowfall at much lower levels such as around Kingsteignton where I live.

As snowfall always gets me interested in going out, I decided to arrange a photo shoot for the evening of the 5th of March, as the weather looked clear and there would even be a nicely sized moon out which would help me navigate in the dark.

I watched the conditions during the day to make sure the sky was nice and clear by nightfall so the star photographs taken would be as clear as possible.

Recce Mission
The day before, I decided to venture up onto the moors in the evening on the 4th March (A Wednesday) to see what the situation was from the Burrator side of the Moor, up to Princetown. I headed out from Plymouth around 18:15pm and drove up to Yelverton and took the B3212 towards Princetown but as I arrived up on the top of Burrator I didn't see any snow, although when I pulled in, it did start to snow very heavily and after a few minutes of waiting I took these sample shots of the snow below to get an idea of how deep it was going to be...

These photos are shot on the road towards Moreton - Hampstead

The reason I wanted to include the detail about the snow is because I want it to feature in one of my photographs, to give it a more wintry feel and more interest than just the stars and the foreground subject. As snow tends to boost the interest within a standard landscape photograph, I want to use this to my advantage and grab a decent photograph while the snow hangs around.

Now all I had to do was wait until the next day and see how the weather changed and whether any more snow fell during the night...

Thursday 5th March 2009
On the Thursday I checked the web cam at Postbridge to see what the snow condition was like and there was loads up there, creating a very even, deep coverage of the fields around. It was also a very clear day on Thursday so I had confidence that the evening would be clear for some amazing star photography.

I travelled back to Newton Abbot and went from there up to the Tor at around 11pm with Alex to see if I could shoot some good photographs, here are some of the results from the evening:

The tor is located here:

Photograph 1
As the moon was up, the sky and surrounding areas where being lit in an almost 'creepy' way in how it was so bright, the snow was causing the moonlight to reflect and illuminate other objects.

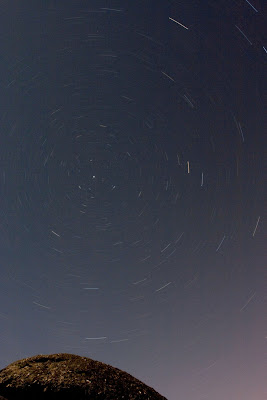
Anyway as for the photograph, I set my camera up near the tor so I could have it as part of my composition while the star trails could still be seen above and to the right of the rock.

The first photo is shown here and the settings I used are below:

Photo Factfile
Shutter Speed: 29 Minutes
Aperture: f16
ISO: 200

I used f16 due to the incredible light being reflected back by the moon, it truly was difficult to work with this amount of light, although I did still manage to achieve this photograph which clearly shows the star trails moving around Polaris.

As for composition, I used to the top part of the tor to supplement the star trails but believe I would have achieved a better composition if I were to include more of the tor and move the trails to one side.

I used ISO 200 to try to avoid as much possible noise build up as possible, because as shutter speeds get longer, digital sensors do tend to pick up noise grain which can ruin the sharpness and quality of the star photograph which I am shooting.

For this photograph, I did have to boost the exposure in Lightroom to make the star trails more visible ( increased exposure to +2.0).

Now for the next photograph...

Photograph 2
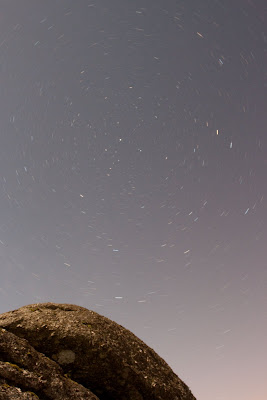
For this one I decided to do a quicker 'sample' photograph to test the conditions, so I used the settings below:

Photo Factfile
Shutter Speed: 9.5 Minutes
Aperture: f8.0
ISO: 800

With these settings I achieved the photo on the right a lot quicker than the one above, which gave me an idea of what to do next with my remaining time and battery life!
I believe cutting the aperture to f8.0 was a wise move as it allowed more light into the camera which then resulted in more stars showing up.

Time for another photo...


Photograph 3
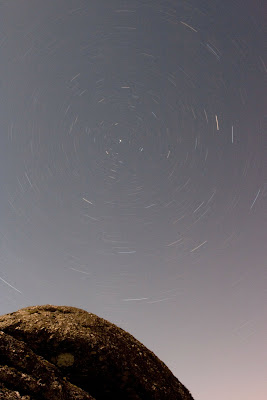
Retaining the high ISO number, I decided to revert back to the f16 setting to try to reduce the ambient lighting from causing flaring effects in my photograph.

Photo Factfile
Shutter Speed: 34 minutes
Aperture: f16
ISO: 400

The high ISO number gave the photo more illumination so that the star trails could easily be seen by the viewer.

I kept the same composition as I did look around to find a different shooting location and couldn't find an outcrop of rock which was high enough and also angled correctly towards Polaris.

Now time for the final photograph of the evening, shot at around 12:15AM so it was getting very late...


Photograph 4
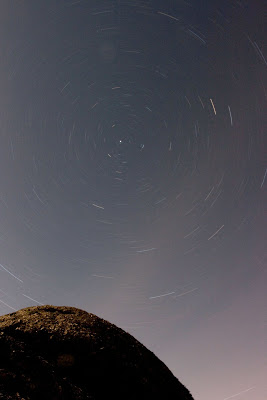
My final photograph, I decided to try my best here and grab a photograph which I could take away and work with over the next few days in Photoshop and achieve a decent image as a result.

Photo Factfile
Shutter Speed: 38 minutes
Aperture: f16
ISO: 200

I went for the longest shutter speed I could considering the time of night it now was and the temperature was falling away to below freezing as the snow froze over and became solid.

Unfortunately as the shoot went on, I realised that I wouldn't be able to feature any in my photos as the angle would be too steep on the camera to include any lying on the ground at all, but I decided to shoot the photos regardless.


The Shoot Evaluation
The photoshoot went well for my second outing and also considering the temperatures that night, which were down around freezing towards midnight.

Composition
This has improved dramatically from the previous photo shoot which I featured on the blog a while ago as I have now attempted to move to the next step and include some foreground interest to grab the viewer's eye. In this setup, the foreground interest is the large granite outcrop of rock at the tor, which is then nicely positioned below the star trails to give maximum effect and not cover up too many of the trails which are visible.

Although I am happy with the composition, I believe I can find another location which has a more interesting subject to be the foreground interest, and more effectively leads the viewer's eye into the star trail above.

Exposure
This is still a slight problem for me as I haven't worked out an effective way to gauge how long the photo should be taken for, although I tried several different speeds and ISO ratings, I still need to develop a consistent method of checking how long the exposure will take and then using this as a guideline for shooting the photos.
This photo shoot resulted in many exposures being taken at unmatching times, giving me irregular results which are difficult to understand when processing.
So for my work to move forward, it needs to become more organised and more thought out so I can arrange the photos correctly when I arrive home.

Friday, 6 March 2009

The Software

Adobe Photoshop Lightroom
This program allows me to quickly find and images either in Jpeg or RAW file format, then edit them in ease, by using simple sliders to change exposure, contrast and among many other things.

Layout
The program is laid out into five tabs which allow you to do different elements of editing or filing by clicking each of the headings.
The headings are:
  • Library
  • Develop
  • Slideshow
  • Print
  • Web
The main two modules which are used are Library (to find the images) and Develop (to develop the image)

The program layout is shown in the print screen image below:
The program is very easy to navigate as the bottom bar features the photos within the import folder you are viewing and all folders are easily viewable in the left hand window. As for developing the images, quick develop options can be used but the full options are only available when you click the 'Develop' module at the top of the screen:


As for the features in the Develop tab, I can do all the basics such as change Exposure, White Balance, Contrast, Brightness etc... some of the alterations can be seen in the print screen image above.

Lightroom is the perfect tool for simple image editing, if the image itself doesn't need a great deal of deep editing (changing subjects, cloning subjects etc) then Lightroom is the ideal tool to give the image you are editing some more presence and vibrance.

However if you wish to do more complex editing to an image, you'll need to use Adobe Photoshop which is discussed below.

Adobe Photoshop
This program is more advanced than Lightroom as it allows you to not only change the basics of the image light Lightroom will, with the built in Adobe Camera RAW program, it will also allow you to edit subjects within the photograph, for example move a signpost or a person to a different location, or get rid of them completely, which can be useful when you cannot shoot the photo without these subjects being in the frame.

The print screen below shows the Adobe Camera RAW program which can be used to make minor adjustments to the image before continuing to make changes to the photograph in Photoshop itself:
When you have finished making changes to the file, you can either save the image and not proceed to Photoshop, by clicking the 'Save Image' button on the bottom left, or proceed to Photoshop by clicking 'Open Image' which will then bring you to the next srceen, shown below:


Many options are available on the right hand side to edit basics in the photograph, although there are many, more photography specific options in the layers tab shown on the right.

These different options all create an adjustement layer which sits over the top of the background image, none of them permantly change the background image, all they do is take the information from the image and then change as per the options selected by the user.

The different adjustment layers allow me to change contrast/exposure and gradients amongst many other very useful alterations.

Wednesday, 4 March 2009

The Hardware

For the project I will use several different pieces of equipment which will help me to produce top quality photographs to be displayed in the summer show during Summer 2009, this blog entry describes the equipment which I will use and why I want to use it.

My own Personal Equipment

The Camera
Canon EOS 400DMy main camera which I have owned for around 2 years now; it has seen me through all of my photography projects to date and I am very proud of the results it has given me. It may be time for a change at some point in the future but for now I am happy with my current camera.

The camera has one of Canon's L lenses mounted to it which benefits me in the ways I have described below; other benefits that the EOS gives me is the ability to shoot RAW images at 10 Megapixel which is adequate for a fairly large print, although other, newer SLR cameras now far exceed this benchmark.

For this project I am confident that my camera will give me good enough images to display in the summer show of 2009.

The Lens
Canon 17-40mm L USM
This lens allows me to get wide angle photographs with confidence, due to the incredible quality of the optics inside this lens. So for my project, whenever I venture out to grab a photograph of the stars, I will take my camera with this lens pre mounted to enable the best possible image capture.

The lens is wide angle, although it may be good to try to get hold of a fish eye lens which will enable further distortion of the scene and allow me get more of a star trail into the frame while having an interesting foreground subject in the composition.

The Tripod
Manfrotto 055xPROB

To make sure my photographs are as sharp as possible, I need to use a sturdy tripod which won't move when the wind blows. I bought this particular Manfrotto tripod around a year ago which will help me get much steadier images, in conjunction with a good quality mount for the tripod, I will improve my chances of getting a sharp image.

The image on the right shows the tripod legs and the rotating central pole which allows lower compositions on the tripod, the top of my tripod has a mount screwed on which gives me full rotation of the camera while it's mounted on the tripod.


Remote Shutter release
RS60-E3

This little device is very central to the whole project as it allows me to set the camera to 'BULB' mode and then keep the shutter open indefinitely until I choose to end the photo taking process.
As the photo below shows, there is a 'Running Lock' which is essentially able to hold the shutter open for as long as I want, all you have to do is plug the remote into the camera and then push the button down to focus and then push up to lock the shutter open, as shown in the second image below.
I will also use torches to help focus the camera on the foreground subject as it will be well after sunset when I venture to the locations for my photo shoots.

Borrowed Equipment
While I work with my own equipment, I may borrow these pieces of equipment from our store at PCA which will enable me to try some different mediums on which to record my photographs.

Hasselblad Medium Format (500cm)
This camera has been a favourite of mine during my last year or so at PCA as it is relatively easy to use as much of the settings are just the same as a normal SLR camera, it is more difficult to load a film into the camera, but is still relatively easy provided you are careful with the film as it can slip off the spool easily.

The image beow shows me using the camera last year up at Brentor Church, near Tavistock:

It is a strange camera in that you can compose your picture by looking down into the square shown above instead of looking into a viewfinder facing forward; it is even more unusual when you go to focus the image with the pop up magnifier in the composition square.
Although all these elements are different, I find the camera fun to use as it is so different from any other camera but not too hard to get used to or use.
Back in the first year I produced some excellent images of a viaduct in Cornwall which has ever since inspired me to use the camera to produce high quality images which can then be scanned in to a computer and printed digitally.

Large Format?
I did have possible thoughts about using a large format camera, but it is just too difficult to get decent results with the camera, here are some of the reasons why I don't wish to use one:
  • The whole kit weighs far too much to go carrying across Dartmoor as I have found out previously, I want to be able to travel light, either with a Medium Format camera or my Digital setup
  • Processing films after shooting is very difficult and can be expensive as I will not be able to process any colour films at college
  • Medium Format can give almost the same quality in a much smaller, less cumbersome unit